
🚀 Quick Overview
- The Goal: Build a custom AI that runs in your terminal.
- The Tech: OpenAI API (The engine behind ChatGPT).
- The Cost: Pennies. (You pay per message, not a monthly fee).
- The “Magic”: We will give it “Memory” so it remembers what you said.
In this tutorial, you will learn how to bypass the ChatGPT website and integrate its brain directly into your Python scripts using the OpenAI API.
We all use ChatGPT. But using the website is limited. You can’t connect it to your database, you can’t make it control your Telegram Bot, and you can’t customize its personality perfectly.
To become an AI Engineer, you need to stop being a user of ChatGPT and start being a builder. Today, we will write a script that sends messages to OpenAI servers and gets intelligent responses back. This is the exact technology behind tools like Jasper, Copy.ai, and GitHub Copilot.
Step 1: The Key (Not Free, but Cheap)
Unlike the libraries we usually use, OpenAI is not free. You must create an account and add $5 credit.
- Go to platform.openai.com.
- Sign up and click “API Keys” on the left sidebar.
- Click “Create new secret key”.
- Copy it immediately! (
sk-proj-1234...). You won’t see it again.
Step 2: The Setup
We need the official OpenAI library. Open your terminal and install:
pip install openaiStep 3: The “Hello World” of AI
Create a file named ai_bot.py. We will send a single question and print the answer.
from openai import OpenAI
import os

# 1. Setup the Client
# (Remember our lesson on Environment Variables? Use them here!)
client = OpenAI(api_key="YOUR_SK_KEY_HERE_OR_USE_ENV_VAR")

# 2. Make the Request
print("Asking AI...")
response = client.chat.completions.create(
    model="gpt-4o",  # Or "gpt-3.5-turbo" for cheaper tests
    messages=[
        {"role": "system", "content": "You are a sarcastic Python tutor."},
        {"role": "user", "content": "Explain loops in one sentence."}
    ]
)

# 3. Print the Answer
print(response.choices[0].message.content)
Run it. You should see a sarcastic explanation of loops!
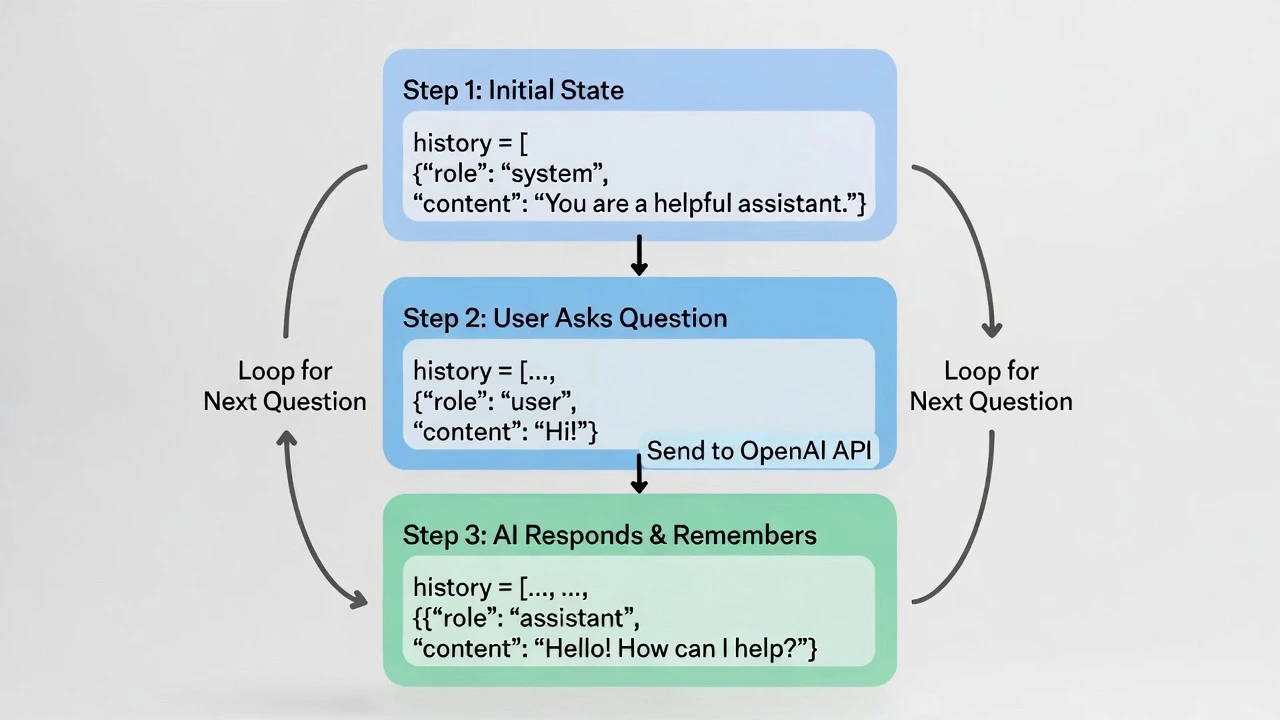
Step 4: Giving it Memory (The Loop)
The script above has amnesia. If you run it again, it doesn’t remember the first question. To build a real chatbot, we need a while loop and a list to store history.
from openai import OpenAI
client = OpenAI(api_key="YOUR_KEY_HERE")
# 1. Initialize the "Brain" (History)
# The "system" message sets the personality.
history = [
{"role": "system", "content": "You are a helpful assistant named LogicBot."}
]
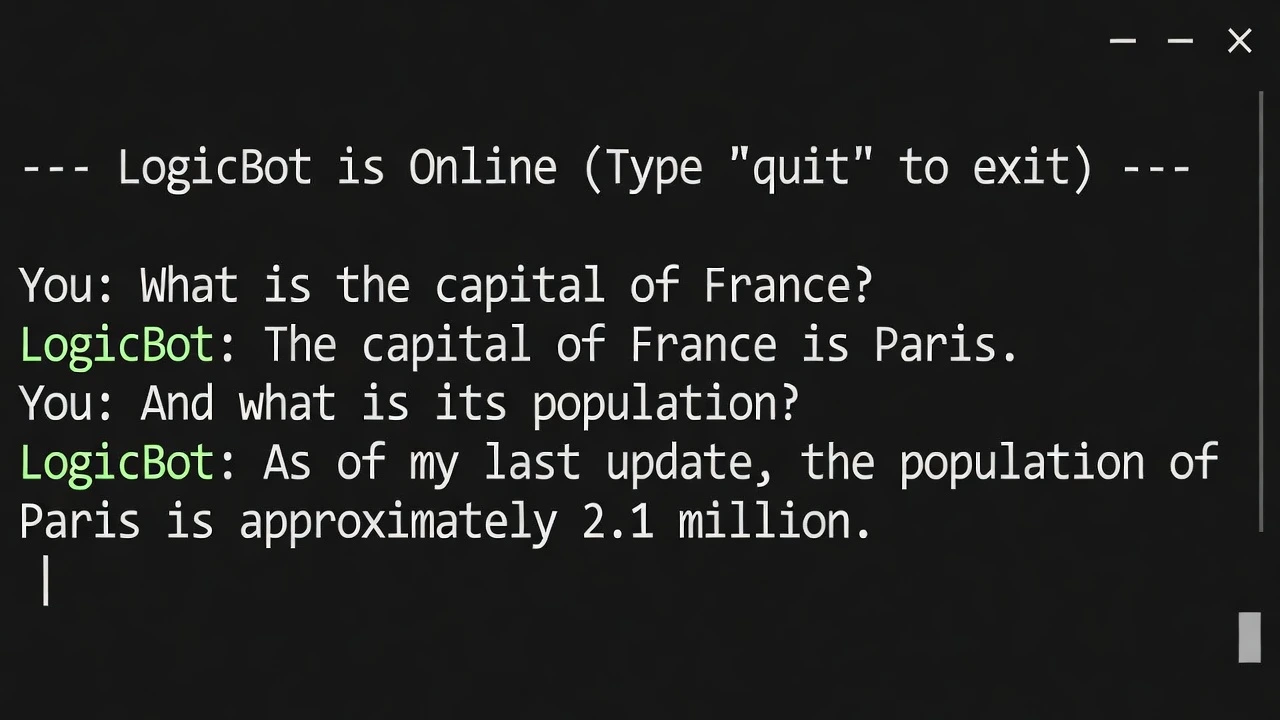
print("--- LogicBot is Online (Type 'quit' to exit) ---")
while True:
# 2. Get User Input
user_input = input("You: ")
if user_input.lower() == "quit":
break
# 3. Add to History
history.append({"role": "user", "content": user_input})
# 4. Ask OpenAI (Sending the WHOLE history)
response = client.chat.completions.create(
model="gpt-4o",
messages=history
)
# 5. Extract and Print Answer
ai_answer = response.choices[0].message.content
print(f"LogicBot: {ai_answer}")
# 6. Add AI's answer to history (So it remembers for next time)
history.append({"role": "assistant", "content": ai_answer})Output
Why This is a Freelance Goldmine
Clients don’t pay for “ChatGPT.” They pay for Context. With the code above, you can change the system message to be anything:
- “You are a Real Estate Agent. Only answer questions about houses in Texas.”
- “You are a Customer Support Bot. Here is our refund policy…”
- “You are a Legal Assistant. Summarize this contract.”
You can connect this to your Telegram Bot or a website to create a specialized product.
Conclusion
You have just unlocked the power of LLMs (Large Language Models). You are no longer limited to if/else logic. You can now write software that thinks.