🚀 Quick Overview
- The Goal: Give a photo to a Python script and have it tell you what is in the picture.
- The Tech:
PyTorchand theResNet50AI model. - The Shortcut: We are using a pre-trained model, so no massive datasets or supercomputers are required!
- Time to Build: 20 Minutes.
In this tutorial, you will learn how to perform image classification in Python using the powerful ResNet50 model to identify objects in photos automatically.
So far, we have taught Python how to read emotion and summarize text. But what happens when you want to build an app that categorizes user uploads, or a script that sorts thousands of disorganized photos on your hard drive?
You need Computer Vision.
Training an Artificial Intelligence to recognize a dog versus a cat from scratch takes hundreds of hours and expensive graphics cards. However, as modern developers, we can use “Pre-Trained” models. Today, we will use a famous AI brain called ResNet50, which has already looked at millions of images and knows how to identify 1,000 different objects instantly.
Step 1: The Setup (Installing PyTorch)
We are going to use PyTorch, the industry-standard Machine Learning library developed by Meta (Facebook), alongside Pillow to handle opening the image files.
Open your terminal and run:
pip install torch torchvision Pillow requestsStep 2: Preparing the Image (The “Translator”)
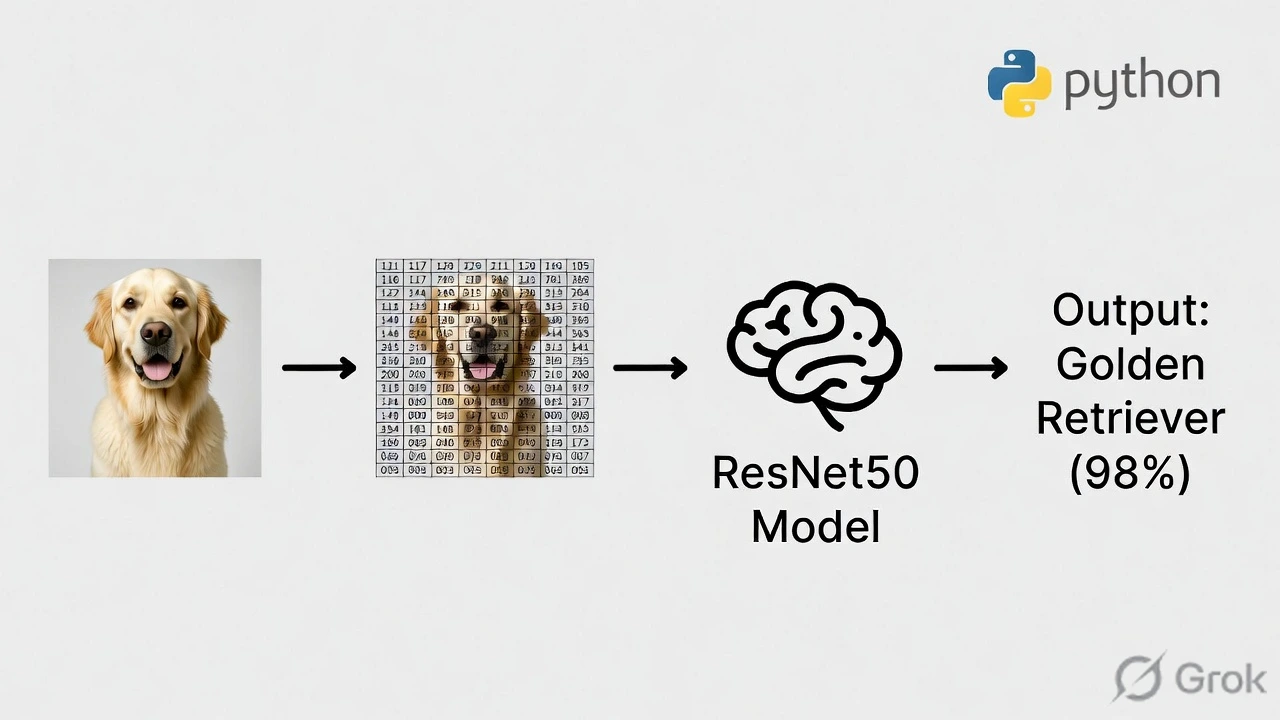
AI models do not have eyes. They cannot “look” at a `.jpg` file. Before we can ask the AI what is in a picture, we have to translate the picture into a giant grid of numbers (a “Tensor”).
Create a file named vision_bot.py. First, we will write the code that grabs an image from the internet and formats it for the AI.
import torch
from torchvision import models, transforms
from PIL import Image
import requests

# 1. Download a test image (A Golden Retriever)
url = "https://images.unsplash.com/photo-1552053831-71594a27632d?w=400"
image = Image.open(requests.get(url, stream=True).raw)

# 2. The "Translator" (Transforms)
# The AI requires images to be exactly 224x224 pixels and mathematically normalized.
preprocess = transforms.Compose([
    transforms.Resize(256),
    transforms.CenterCrop(224),
    transforms.ToTensor(),
    transforms.Normalize(mean=[0.485, 0.456, 0.406], std=[0.229, 0.224, 0.225]),
])

# 3. Apply the translation
input_tensor = preprocess(image)
# We add an extra dimension because the AI expects a "batch" of images, even if it's just one.
input_batch = input_tensor.unsqueeze(0)

print("Image prepared for AI!")
Step 3: Loading the Brain (ResNet50)
Now that our image is formatted into numbers, we feed it into the ResNet50 model. The model will spit back 1,000 different scores (one for each object it knows). We will grab the highest score.
# 4. Load the Pre-Trained Model
print("Loading ResNet50 (This may take a minute the first time)...")
model = models.resnet50(pretrained=True)

# Set the model to "evaluation mode" (we are using it, not training it)
model.eval()

# 5. Make the Prediction
with torch.no_grad(): # Tell PyTorch not to calculate gradients (saves memory)
    output = model(input_batch)

# 6. Find the winning category
# The output is a list of 1000 probabilities. We want the index of the highest one.
predicted_class_id = torch.nn.functional.softmax(output[0], dim=0).argmax().item()

# 7. Translate the ID back to an English word
# We download the official dictionary of all 1,000 labels
LABELS_URL = "https://raw.githubusercontent.com/pytorch/hub/master/imagenet_classes.txt"
labels = requests.get(LABELS_URL).text.split('\n')

winning_label = labels[predicted_class_id]
print(f"\n🎯 The AI thinks this image is a: {winning_label.upper()}")
Step 4: The Output
When you run the script, the AI will download the image of the dog, process the pixels, and confidently print:
🎯 The AI thinks this image is a: GOLDEN RETRIEVER
Real-World Freelance Value
You can package this simple script into highly valuable business tools:
- E-commerce Automation: Automatically tag and categorize user-uploaded product photos on a marketplace website.
- Security Tools: Connect this to a FastAPI backend to verify if a user has uploaded a photo of an ID card versus a random selfie.
Conclusion
You have officially stepped into the realm of Computer Vision. By utilizing pre-trained models like ResNet50, you can add state-of-the-art AI features to your applications without spending a dime on supercomputers.