🚀 Quick Overview
- The Problem: Opening Premiere Pro to manually edit 30 daily YouTube Shorts or TikToks takes hours of tedious rendering.
- The Solution: Write a Python script to stitch an image and an AI voiceover together into a perfectly formatted 9:16 vertical video instantly.
- The Tech: The
moviepylibrary. - Time to Build: 20 Minutes.
In this tutorial, you will learn how to automate YouTube Shorts and TikTok videos using Python and the MoviePy library, bypassing expensive video editing software completely.
The “Faceless Channel” trend is creating a new wave of digital wealth. Creators are building massive audiences on YouTube Shorts and TikTok by posting daily trivia, Reddit stories, and motivational quotes without ever showing their faces.
But the creators who are actually making money aren’t sitting in Premiere Pro manually dragging audio files onto timelines. They are automating the entire pipeline.
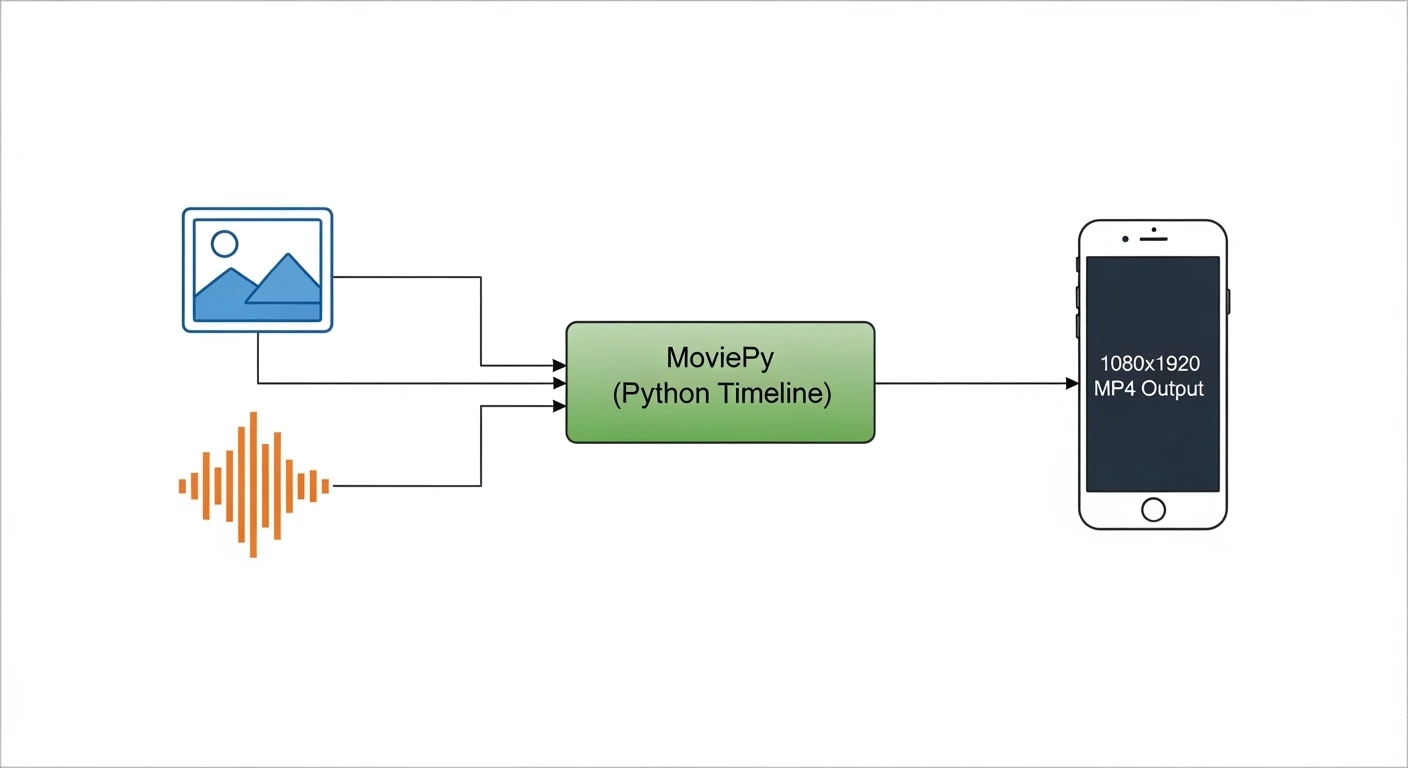
In our last tutorial, you generated a studio-quality AI voiceover. Today, we are going to teach Python how to “see” video. We will write a script that takes a static background image, overlays your AI audio, crops it to the exact vertical dimensions required by YouTube Shorts (1080×1920), and renders a final MP4 file.
Step 1: The Setup
To programmatically edit video files, we need the MoviePy library. MoviePy is a powerful wrapper that sits on top of FFmpeg, making complex video math incredibly easy to write in Python.
pip install moviepyNote: Ensure you have your AI voiceover file (e.g., voiceover.mp3) and a high-quality background image (e.g., background.jpg) in the same folder as your script before starting.
Step 2: The Editing Timeline
If you have ever used video editing software, you know the basic workflow: you import your assets, set their duration on the timeline, and adjust their size. MoviePy works the exact same way, just with code.
Create a file named shorts_generator.py:
from moviepy.editor import AudioFileClip, ImageClip

print("1. Importing Assets...")
# Load our AI voiceover from the previous tutorial
audio_clip = AudioFileClip("voiceover.mp3")

# Load our background image
image_clip = ImageClip("background.jpg")

# 2. Syncing the Timeline
print("2. Syncing image duration to audio length...")
# The video should only be as long as the spoken audio
image_clip = image_clip.set_duration(audio_clip.duration)

# 3. Marrying Audio and Video
print("3. Attaching audio track to video track...")
# Attach the audio to our static image to create a "video"
video_clip = image_clip.set_audio(audio_clip)

print("Timeline setup complete!")
Step 3: Formatting for YouTube Shorts (9:16 Vertical)
Right now, our video is just the raw size of whatever image you downloaded. YouTube Shorts and TikTok require a very specific, vertical aspect ratio: 1080 pixels wide by 1920 pixels tall (9:16).
We need to add a line of code to automatically resize and crop our background image so it perfectly fills a smartphone screen.
from moviepy.video.fx.all import crop, resize

# ... (Continue from Step 2) ...

print("4. Formatting for TikTok / YouTube Shorts (1080x1920)...")
# Calculate the center of the image to ensure we crop the middle, not the edges
w, h = video_clip.size

# We force the video to be 1920px tall, maintaining its original aspect ratio first
video_clip = resize(video_clip, height=1920)

# Then we crop the width to exactly 1080px from the center
new_w, new_h = video_clip.size
video_clip = crop(
    video_clip,
    x_center=new_w/2,
    y_center=new_h/2,
    width=1080,
    height=1920
)

# 5. Render the final MP4
print("5. Rendering final video... (This may take a minute)")
# fps=24 is standard cinematic frame rate.
# Since it's mostly a static image, we can keep the fps low to save render time!
video_clip.write_videofile("final_short.mp4", fps=24, codec="libx264", audio_codec="aac")

print("✅ Video complete! Check your folder for 'final_short.mp4'.")
Step 4: Watch Your Automated Masterpiece
Run the script. You will see MoviePy’s progress bar ticking in your terminal as it encodes the video.
Once it finishes, open final_short.mp4. You will see a perfectly formatted, high-definition vertical video with your AI audio playing seamlessly in the background. What used to take 10 minutes of clicking in Premiere Pro just happened in 5 seconds of rendering.
Real-World Freelance Value
You now have the core engine for a highly lucrative software business. To scale this up, you can:
- Batch Processing: Put this script inside a
forloop. Point it at a folder with 30 images and 30 audio files, and let Python render an entire month of TikTok content while you sleep. - Client Delivery: Sell “Short-form content packages” to local businesses. They give you a script, you run your code, and you deliver 10 ready-to-post videos the next morning.
Conclusion
By treating video files as data, you can automate visual content creation just like you automate spreadsheets. Next week, we will level up this script by teaching Python how to automatically generate and “burn” viral, dynamic subtitles directly onto the video!