🚀 Quick Overview
- The Problem: Managing a massive Notion database manually becomes tedious as your freelance business grows.
- The Solution: Write a Python script to add items, update statuses, and query data automatically.
- The Tech: The official Notion API and the Python
requestslibrary. - Time to Build: 20 Minutes.
In this tutorial, you will learn how to seamlessly connect Python to the Notion API to automate your workspace and build a customized productivity tracker from scratch.
I rely heavily on Notion to run my tech stack. Every article idea, freelance invoice, and code snippet I save ends up in a Notion database. But here is the hard truth: if an organizational system requires you to constantly open a browser, click five menus, and manually paste data, you will eventually stop using it.
A few weeks ago, I got tired of manually entering the data from my automated web scrapers into my Notion workspace. So, I decided to eliminate the middleman.
Today, I am going to show you how to generate a secret Notion integration key and write a Python script that injects data straight into your task board. We are turning Notion into a living, breathing database.
Step 1: Get Your Secret Integration Key
Just like Google Sheets, Notion needs to know that your Python script is authorized to access your private data. We need to create an “Integration.”
- Go to Notion’s Integration Dashboard.
- Click New integration.
- Name it “Python Task Bot” and select the workspace you want it to access.
- Click Submit. You will be given an Internal Integration Secret (it starts with `secret_`). Copy this immediately.
Step 2: Connect the Bot to Your Database
Your bot exists, but it currently has access to *nothing*. We must explicitly invite it to a specific page.
- Open Notion and create a new page. Type
/databaseand select Database – Full page. - Name it “Freelance Tracker”. It will have a default “Name” column (Title property). Let’s add one more column named “Status” (Select property with options: Todo, In Progress, Done).
- In the top right corner of Notion, click the three dots (…).
- Scroll down to Connections -> Add connection, search for “Python Task Bot”, and click Confirm.
Finally, we need the Database ID. Look at the URL in your browser when viewing your database. It looks like this:
https://www.notion.so/<strong>a1b2c3d4e5f6g7h8i9j0</strong>?v=xyz...
The long string of letters and numbers before the question mark is your Database ID. Copy it!
Step 3: Writing the Python Script
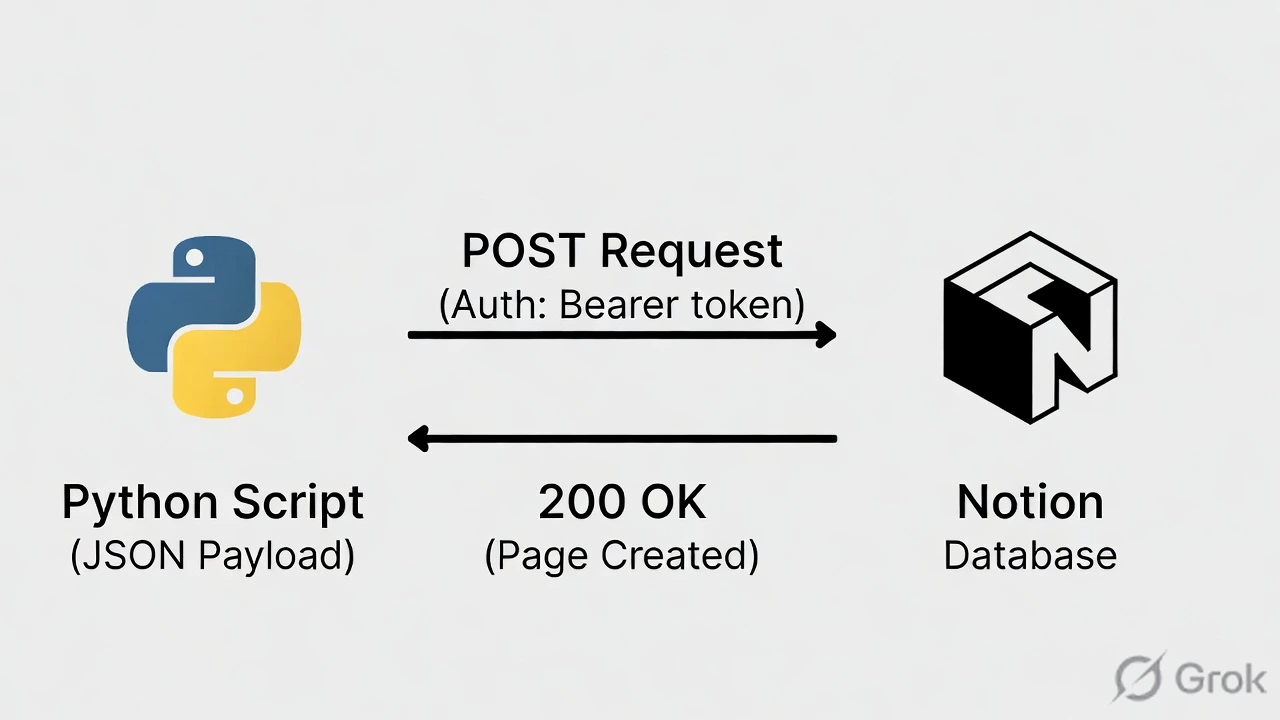
We are going to use the requests library to send HTTP POST requests directly to Notion’s servers. Open your terminal and ensure it is installed:
pip install requestsCreate a file named notion_bot.py and add the following code. (Remember to paste in your unique tokens!)
import requests
import json

# --- 1. Your Credentials ---
NOTION_TOKEN = "secret_YOUR_KEY_HERE"
DATABASE_ID = "YOUR_DATABASE_ID_HERE"

headers = {
    "Authorization": f"Bearer {NOTION_TOKEN}",
    "Content-Type": "application/json",
    "Notion-Version": "2022-06-28" # Required by Notion
}

def create_notion_page(task_name, status="Todo"):
    print(f"Adding task: '{task_name}' to Notion...")

    # The URL to create a new page
    create_url = "https://api.notion.com/v1/pages"

    # --- 2. The Payload (How Notion formats data) ---
    new_page_data = {
        "parent": {"database_id": DATABASE_ID},
        "properties": {
            # The "Name" column
            "Name": {
                "title": [
                    {
                        "text": {
                            "content": task_name
                        }
                    }
                ]
            },
            # The "Status" column
            "Status": {
                "select": {
                    "name": status
                }
            }
        }
    }

    # --- 3. Send the Request ---
    response = requests.post(create_url, headers=headers, data=json.dumps(new_page_data))

    if response.status_code == 200:
        print("✅ Successfully added to Notion!")
    else:
        print(f"❌ Error: {response.status_code}")
        print(response.text)

# Let's test it!
if __name__ == "__main__":
    create_notion_page("Review new API documentation", status="In Progress")
    create_notion_page("Send invoice to Stark Industries")
Step 4: The Result
Run the script. Then, open your Notion workspace in the browser. You will instantly see your two new tasks populated in the database with the correct statuses applied.
The data format Notion requires (the large JSON dictionary in Step 2) looks a bit intimidating at first, but it is incredibly structured. Once you have this template, you can easily modify it to add dates, checkboxes, or rich text content to the page body itself.
Why This Matters for Freelancers
This is where basic scripting evolves into full-scale systems architecture. Imagine combining this with the FastAPI server we built previously.
You could have an Android app where a user submits a support ticket, and your Python backend instantly creates a formatted card in your private Notion workspace for you to review. You just built a custom CRM without paying for enterprise software.
Conclusion
By mastering the Notion API, you have gained the ability to use one of the world’s most popular productivity tools as your own personal database. Next week, we are taking this data and turning it into interactive web dashboards!