🚀 Quick Overview
- The Problem: 80% of users watch social media videos on mute. Without subtitles, they swipe away instantly.
- The Solution: A Python script that listens to your video, generates timestamps, and burns the text directly onto the video frames.
- The Tech:
openai-whisperandmoviepy. - Time to Build: 25 Minutes.
In this tutorial, you will learn how to add subtitles to a video using Python by combining OpenAI’s Whisper model with MoviePy to automate viral content creation.
If you have ever tried to grow a TikTok or YouTube Shorts channel, you already know the golden rule: Retention is everything. If your viewer doesn’t see dynamic text popping up on the screen in the first 3 seconds, they swipe away.
Manually typing out subtitles, finding the exact millisecond a word was spoken, and perfectly aligning text blocks in Premiere Pro is a nightmare. It is the most tedious part of video editing.
But we are developers. We don’t do manual labor. We are going to take the Whisper AI transcription bot we built in Week 1, extract the exact timestamp of every spoken sentence, and use the MoviePy editing engine to “burn” those words directly onto our MP4 files.
Step 1: The “ImageMagick” Requirement
To draw text on a screen, MoviePy relies on a powerful underlying engine called ImageMagick. Before we write any Python code, you must install this on your computer.
Windows: Download the installer from the official website. Crucial: During installation, you MUST check the box that says “Install legacy utilities (e.g. convert)”.
Mac: Open your terminal and type
brew install imagemagick.Linux:
sudo apt install imagemagick.Once that is installed, ensure your Python libraries are ready: pip install moviepy openai-whisper.
Step 2: Extracting Timestamps with Whisper
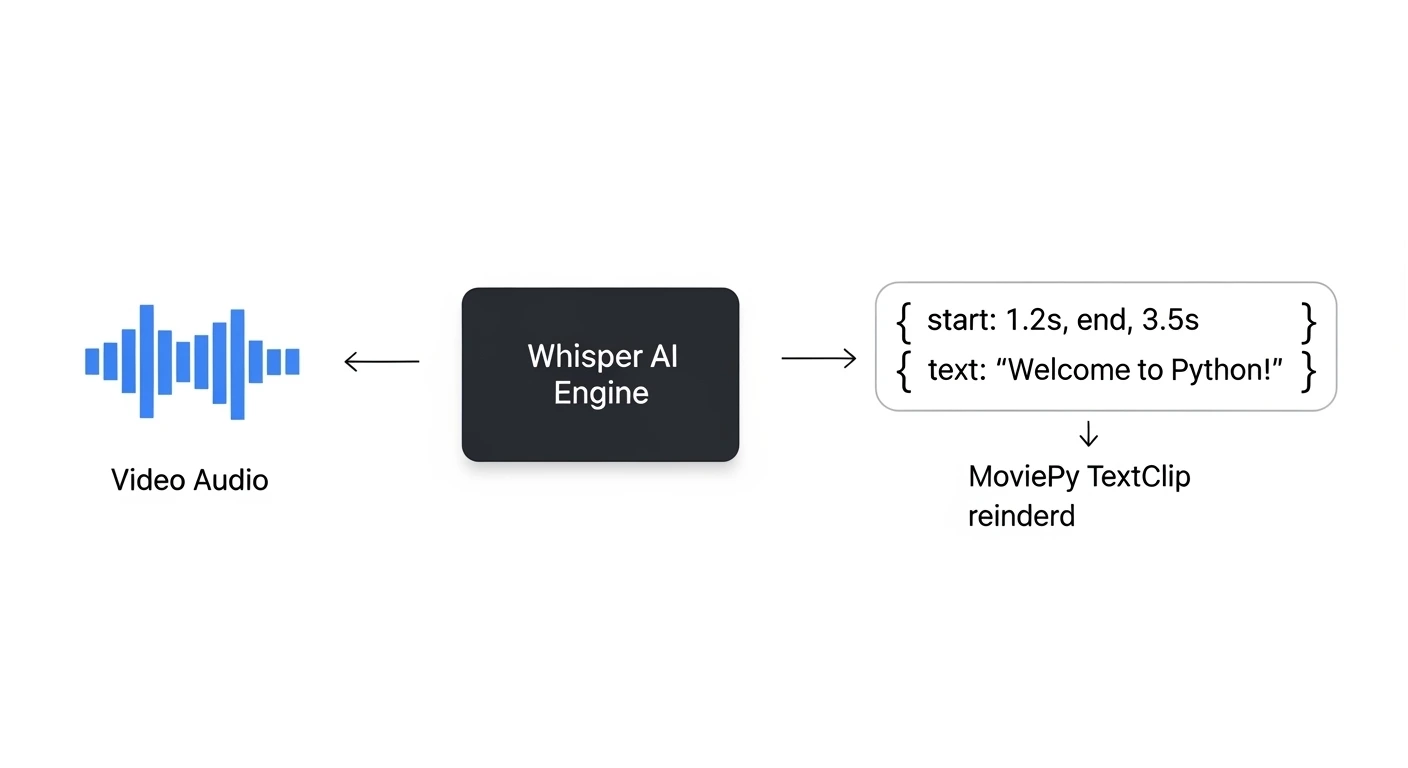
When Whisper transcribes audio, it doesn’t just give us a block of text. It actually gives us a highly detailed dictionary of “segments,” including the exact start and end time of every sentence. We are going to use that data to tell MoviePy exactly when to show the text.
Place a short, speaking video named tiktok_ready.mp4 in your folder. Create a file named auto_subtitler.py and add this code:
import whisper
from moviepy.editor import VideoFileClip, TextClip, CompositeVideoClip

print("1. Loading Whisper AI and analyzing video audio...")
model = whisper.load_model("base")

# Whisper is smart enough to extract the audio directly from our MP4 file!
result = model.transcribe("tiktok_ready.mp4")

# Let's see what Whisper found
print("--- Extracted Timestamps ---")
for segment in result["segments"]:
    print(f"[{segment['start']}s -> {segment['end']}s] {segment['text']}")
If you run this, you will see exactly how Whisper breaks down the speech second-by-second.
Step 3: Burning the Text to the Video
Now, we loop through those segments. For every sentence, we create a transparent MoviePy TextClip, set its duration to match the Whisper timestamps, and stack it on top of our video.
# ... (Continue from Step 2) ...

print("\n2. Generating subtitle graphics...")
video = VideoFileClip("tiktok_ready.mp4")

# This list will hold all our individual text graphics
subtitle_clips = []

for segment in result["segments"]:
    start_time = segment["start"]
    end_time = segment["end"]
    text = segment["text"]

    # Create the text graphic (Viral Style: Bold, White text, Black outline)
    txt_clip = TextClip(
        text,
        fontsize=70,
        color='white',
        font='Arial-Bold',
        stroke_color='black',
        stroke_width=2,
        method='caption', # Wraps the text if it's too long
        size=(video.w * 0.9, None) # Max width is 90% of the screen
    )

    # Position the text near the bottom and set exactly when it appears/disappears
    txt_clip = txt_clip.set_position(('center', 0.75), relative=True)
    txt_clip = txt_clip.set_start(start_time).set_end(end_time)

    subtitle_clips.append(txt_clip)

print("3. Compositing video and rendering...")
# Stack the original video and ALL the subtitle clips together
final_video = CompositeVideoClip(
+ subtitle_clips)
# Render the final file
final_video.write_videofile("viral_subtitles.mp4", fps=24, codec="libx264", audio_codec="aac")
print("✅ Complete! Your video is ready for TikTok.")Step 4: The Result
Open viral_subtitles.mp4. You will see a perfectly formatted video where bold, highly readable text pops onto the screen in perfect synchronization with the spoken words.
You have just automated the most expensive and time-consuming part of social media management.
Real-World Freelance Value
By combining this script with our 16:9 to 9:16 Auto-Cropper, you possess a complete Content Repurposing Engine.
You can pitch YouTubers or Podcasters the following service: “Send me your 1-hour landscape video. My custom software will slice it, reformat it for TikTok, and apply viral subtitles automatically. I will deliver 10 ready-to-post Shorts to you by tomorrow morning.”
Conclusion
You are officially wielding Python as a multimedia tool. You have moved beyond data and text, manipulating the visual components that drive the modern internet. In our next tutorial, we will learn how to automate the final piece of the YouTube puzzle: Auto-Generating Custom Thumbnails!